Watch the helpful instructional video by clicking image above
BEFORE YOU BEGIN
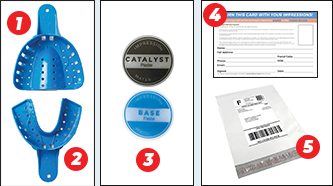
WHAT’S INCLUDED
The contents of your kit may vary depending on the your purchase! Everything you need to make a quality impression has been included with your kit.
-
1
UPPER IMPRESSION TRAY Can ONLY be used to make an upper impression (note: may not be included with your kit).
-
2
LOWER (or upper) IMPRESSION TRAY Can be used for both the upper or lower impressions.
-
3
IMPRESSION PUTTY (1 SET = 1 blue + 1 white): You may have 2 or 3 sets of impression material depending on your kit. 1 of the sets is extra.
-
4
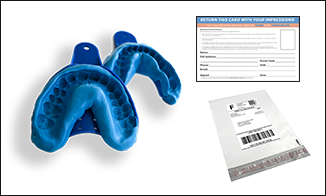
CONSENT CARD (included in your kit): Consent card must be filled out and returned with your dental impressions or your trays cannot be made!
-
5
RETURN ENVELOPE: Return bag with prepaid postage (US-customers only).
PREPARE FOR IMPRESSION

If you haven’t already done so, watch the video
above!
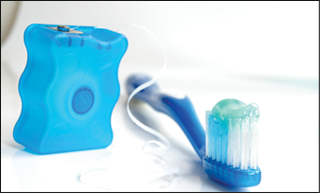
Start by brushing and flossing thoroughly. Clean teeth
are important for the
perfect impression.
Make sure you have in front of you:
- Complete impression kit
- Stop watch
- Paper towels
- Glass of water
- Mirror (trust us, it really helps!)
- Knife
AT ANY POINT YOU’RE CONFUSED OR HAVE QUESTIONS, Email, call, or visit our website to use the live chat feature during work hours...we can help!
MAKING YOUR IMPRESSION
MIXING CATALYST & BASE PUTTY
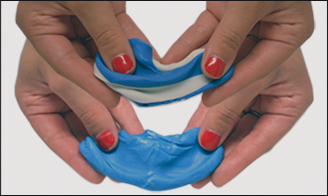
Mix Quickly! - Once the two materials touch, a hardening process begins. Mixing too long after white streaks have vanished will result in the material hardening before you make your impression.
Using one catalyst (white) & one base (blue) paste you will mix them until they’re a solid blue. If there are still heavy white streaks, keep mixing!
- Roll each paste into a ball (1 white & 1 blue).
- Smash the two balls together to create a flat saucer.
- Continuously fold the paste in half, mashing together. Repeat 20+ times within 60 seconds.
- Once white streaks have vanished and the putty is a solid blue immediately proceed to next step.
PLACE PUTTY IN TRAY
Time Sensitive! - Material is hardening at this very moment so load the tray and move onto the next step
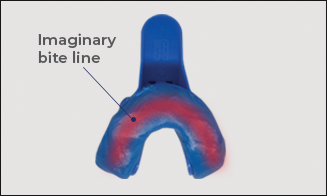
Set putty in tray as shown in the image above. Spread evenly within 30 seconds or less.
- Roll the putty into a sausage shape and lay it into the tray.
- Press it in gently so it fills the entire tray.
- The image above has a red area that highlights where you will want your teeth to be when making the impression.
Positioning your teeth too far forward or back will result in scraping the walls of the impression tray which will affect the fit of your custom-fitted trays.
MAKE YOUR IMPRESSION

Simple tips!- A mirror helps! It’s better to leave it in too long rather than not long enough. Teeth AND gums should be in the putty. Don't wiggle while making impression..
- Put the entire impression tray in your mouth. Do NOT bite.
- Place both thumbs on the back of the tray (where your molars are).
- Continuously fold the paste in half, mashing together. Repeat 20+ times within 60 seconds.
- Gently press teeth into the putty ensuring that all the teeth enter the putty at the same time. Do NOT bite.
- Make sure the putty gets up onto the gums. Gently press overflow material into gums. Do NOT bite or wiggle while hardening.
- Hold in place for a minimum of 3 minutes. Do not wiggle the impression or talk. Use paper towel to clean up excess saliva.
- Continuously check the hardness of the material with your finger.
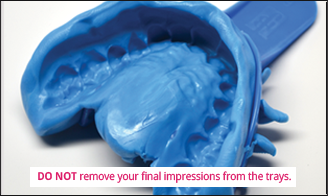
- Once cured, pull down on the tab remove impression. Don’t press the putty with your fingers. Leave impression in the tray.
VERIFY IMPRESSION QUALITY
IMPORTANT! - Save yourself time and money by sending us a picture of your impression! If you’re unsure of the quality, email our team at support@smilebrilliant.com and we’ll respond quickly!
- Can you clearly see your teeth and the line where your teeth meet your gums?
- Any signs that the putty was not hard enough (drag marks or warped teeth?
FLIP INSTRUCTION BOOKLET OVER TO SEE EXAMPLES OF BOTH GOOD AND BAD IMPRESSIONS.
Let the impression sit for 30 minutes and then rinse with soap & cool water. Do not place impressions into shipping bag until they have hardened. Repeat the process if your kit requires both an upper & lower impression.
MAIL IT IN...YOU’RE ALL SET!
TAKE A PICTURE OF RETURN POSTAGE

IMPORTANT!- This is your unique tracking number and we do not know it! If your package gets lost or misplaced, we will need your picture.
Take a picture of the tracking information on your return envelope. You can use this information to track the delivery of your impression to our lab.
INSTRUCTION HAS ONE-TIME OFFER COUPONS!Save up to 50% off Smile Brilliant products by clipping the coupons on the back of the instruction manually included with your impression kit. Return them with your impressions.
RETURN EVERYTHING TO OUR LAB
IMPORTANT! If you do not fill out the consent card included with your kit, your order will not be processed! Don't forget it!
- Use the prepaid postage bag (US customers) to return your impressions and consent card
- Make sure you fill out the consent card and return it or you your order will not be processed!
- On the back of your instruction booklet (included with your impression kit) are a series of one-time use coupons. Save up to 50% by simply clipping the coupons, and send them in along with your impressions and consent card.